Pc / Laptops
How to Use Your Laptop as a Wi-Fi Hotspot
Have you ever been during a situation where you’ve got no W-Fi router, only one network cable and five people that got to use the Internet? or even you’ve got a 3G dongle that works together with your laptop, but leaves your Wi-Fi-only tablet offline. Sounds familiar? it might certainly be handy to share the web connection amongst all users and devices without a router, right? Have your tried tv internet phone – Spectrum gold package
Or maybe this scenario will ring a bell. Many hotels offer wired Internet access for free of charge , but charge you for Wi-Fi and/ or for using the web on quite one device. So do you have to just pay the crazy amount they ask for? Not necessarily.
You can share your laptop or desktop Internet connection via Wi-Fi to other devices, and for the foremost part, it’s quite simple. Mac users face no trouble in the least , as fixing Internet sharing in OS X is simply a few of click away, except for Windows users the method are often a touch bit more laboured. The built-in options don’t always cut it thanks to the complicated setup and reliability problems.
Use Windows 7, Windows 8, or Windows 8.1 Laptops as Wi-Fi Hotspots
Thankfully, there are quite few apps that permit you employ your machine as a Wi-Fi hotspot. Before you employ any of those apps, you’ll want to ascertain the steps on Microsoft’s site to see Windows’ built-in Internet sharing and see if you’ve got better luck than we did. We do recommend that you simply skip that and use a third-party app instead, since the experience is typically far better .
We tested some popular apps that permit you are doing this – Connectify and Virtual Router Plus. The latter didn’t work alright for us. Our anti-virus flagged it as a threat and through installation it tried to form us install unwanted software.
We did not have an equivalent issues with Connectify. it’s a reliable app for turning your computer into a Wi-Fi hotspot. Before you proceed, know that you simply will need a Windows PC with a Wi-Fi adapter (or built-in Wi-Fi) to form this work. If your computer doesn’t have Wi-Fi, then you’ll buy one that connects via USB, like this one.
Here are the steps to setup your Windows machine as a Wi-Fi hotspot:
- Download Connectify and install it. The installation is pretty straightforward and when installation is complete, restart your computer.
- After restarting the pc , check whether it’s connected to the web . If it is, run the Connectify Hotspot app.
- You’ll see two tabs within the app – Settings and Clients. within the Settings tab, under “Create a…” click Wi-Fi Hotspot.
- Under Internet to Share, you will see a menu . Expand it and choose the connection you would like to share. We tested this app with a wired and a wireless connection and located that it worked perfectly with both.
- Under that, you will see some more options. Add a Wi-Fi password. Click Start Hotspot.
That’s all you would like to try to to . Now other devices will detect a Wi-Fi network labelled Connectify-me. Key within the password and you’re good to travel .
Connectify may be a paid app, but it’s a stripped down free version. you’ll create a hotspot with the free version, but the most limitation is that it automatically disconnects every half-hour and shows pop-ups asking you to shop for the professional version. you will have to re-enable the hotspot manually to start out using it again.
The Pro version has more features and costs $25 (Rs. 1,550) for a year and $40 (Rs. 2,450) for a full licence. aside from unlimited hotspot uptime, you get features like custom hotspot naming, the power to share Internet from 3G and 4G networks (for sharing USB Internet dongles), and advanced firewall controls (choose which devices can access Internet and private files on your LAN).
Use OS X MacBook as Wi-Fi Hotspot
Mac users have it tons easier. Here’s the way to share your Mac’s Internet connection.
- Open System Preferences > Sharing > check Internet Sharing on the left.
- On the proper , expand the menu next to Share your connection from: and choose the connection you would like to share. you’ll share Internet connections from Ethernet, Wi-Fi, Bluetooth, or maybe iPhone USB.
Typically, you’d want to pick Ethernet, if you’re employing a wired Internet connection iMac, Mac Pro, or MacBook Pro. If you’re using an external Ethernet adapter with a MacBook Air, you’ll be wanting to pick USB Ethernet or Thunderbolt Ethernet, depending upon the type of dongle you’re using (usually it’s USB). - Just below that, there is a box next to To computers using: where you ought to check the box next to Wi-Fi.
- Click the Wi-Fi Options button below the box. Pick a Network Name, Security Type and enter the password twice in fields named Password and Verify. We strongly recommend you select a password, rather than leaving the safety option has None. you’ll leave Channel because the default value unless you recognize what you’re doing. Click OK.
- If the connection is active, you will see a green icon and text Internet Sharing: On under System Preferences.
That’s all. you will be ready to use the web on other devices now by connecting to the network you specified under Network Name.
That is how you switch your PC or Mac into a Wi-Fi hotspot. Are there the other ways in which you wont to get this done? allow us to know via the comments.


These days enabling automatic updates has become the norm on practically every OS . This has its benefits – you don’t need to manually download updates to apps and every one critical security patches are downloaded automatically to your phone or computer.
Enabling automatic updates on a smartphone doesn’t really bother most of the people . Sometimes apps may start crashing after updates but by and enormous , apps still work needless to say after updates. You’re also unlikely to be employing a bunch of apps at an equivalent time. However, that’s not true on a Mac or a PC.
At any point we’ve got a minimum of eight apps open. Enabling automatic updates is convenient but not the simplest idea because apps need to be closed before installation can begin. That prompt tends to interrupt our workflow and we’d rather not affect it within the middle of the work day.
First up, let’s find out the way to enable or disable automatic updates on Mac.
- Click the Apple logo on the highest left and open System Preferences.
- Click on App Store. Now you’ll see a bunch of options handling automatic updates on macOS.
- To disable automatic updates, click on the tick mark next to Automatically check for updates to uncheck it, which is checked by default.
- To enable automatic updates, click the empty box next to Automatically check for updates. You’ll see a tick mark within the box now.
macOS automatic update options
That covers the fundamentals . If you follow these steps, you’ll either enable or disable the system’s automatic checks for app and macOS updates. There are other options here that permit you select once you want to download and install updates.
The first option is Download available updates within the background. this is often enabled by default and macOS automatically downloads all updates within the background and prompts you once they are able to install. If you disable this, you’ll simply get a notification stating that updates are available. Downloading updates within the background is usually an honest idea as you don’t need to await downloads to finish once you manually update. However, if you regularly use cellular data on your Mac, you would possibly find yourself with an enormous data bill if you allow this feature checked.
The second option is Install app updates and therefore the third one is Install macOS updates. If you enable these both, the system will automatically install – not just download – all updates. We don’t recommend this for many people because it tends to interrupt what you’re doing and provides updates first priority. These options aren’t enabled by default.
The fourth option is Install system data files and security updates. this is often also enabled by default and that we recommend that you simply let it’s enabled. It pushes critical security patches to your Mac as soon as they’re available, so it’s best have this on in the least times.
This should answer your queries around automatic updates on macOS. For OS updates, macOS also allows you to automatically install them late in the dark once you aren’t using the machine. this feature pops up as a notification to put in updates once you are working, but you’ll snooze that and have the updates installed in the dark .
Microsoft has made its digital personal assistant – Cortana – more integral to Windows 10 with every major update. aside from searching your computer, it displays notifications, can send emails, set reminders, and do all of that using your voice. Some might find it too intrusive though, and would like to show the helper off.
While you’ll close up Cortana with one toggle within the days before the Anniversary Update, that’s not possible. And with the recent Windows 10 Creators Update, disabling Cortana can entirely break search, consistent with reports, with the sole thanks to fix it being a clean install.
If you’re still bent plugging the plug on Cortana’s capabilities in Windows 10, there are ways to travel that . you’ll deduct the tools it uses to find out about you, otherwise you can completely switch it off.
Prevent Cortana from knowing you
First, let’s head into Cortana’s settings to chop off all the separate ways it monitors your computer habits. Here’s how:
- Click the search box or the Cortana icon next to the beginning key.
- Open Cortana’s settings panel with the gear icon.
- In the settings screen, close up every toggle from On to Off.
- Next, scroll to the very top of the settings panel, and click on on Change what Cortana knows about me within the cloud.
- Microsoft will fetch a page from the web called Personal Information within the same Start panel.
- When it loads, scroll to the very bottom, and hit Clear.
- To serve you better, Cortana collects data about your typing and talking, as well. If you’d wish to turn that off, follow these steps:
- Hit the beginning key.
- Click the Settings gear icon.
- Select Privacy.
- In the left panel, search for Speech, inking & typing.
- Click Stop going to know me.
- Remember, turning this off also will disable dictation across Windows 10. If that’s a service you believe , then you will have to place up with Windows ‘getting to understand you’.
Turn off Cortana completely
Once you’ve skilled the steps above, Cortana won’t answer your voice. But it’s still running within the background, waiting to be called upon.
To get obviate it completely, you would like to try to to more. counting on the version of Windows 10 you employ – Home, Pro, or Enterprise – the steps are going to be slightly different.
How to disable Cortana on Windows 10 Pro
- Hit the beginning key, look for Edit group policy, and open it.
- Navigate to Computer Configuration > Administrative Templates > Windows Components > Search.
- Find Allow Cortana, and double-click to open it.
- Click Disabled, then hit OK.
How to disable Cortana on Windows 10 Home
The process is slightly trickier, and involves editing the Windows Registry. If you’re not comfortable with this process, we propose taking a backup, or setting a restore point.
- Hit the beginning Key, look for regedit, and open it.
- Navigate to HKEY_LOCAL_MACHINE > SOFTWARE > Policies > Microsoft > Windows.
- Right-click the Windows directory, and choose New > Key. Type in Windows Search, and hit enter.
- Select Windows Search. within the right-hand side pane, right-click within the empty area and choose New > DWORD (32-bit) Value. Type in AllowCortana, and hit enter.
- Double-click AllowCortana, and sort in 0 under Value Data.
- Restart your computer, and Cortana should now be gone. rather than “Ask me anything”, the new search box will only say “Search Windows”.
Did you’ve got any trouble following any of the above steps? allow us to know via the comments below.
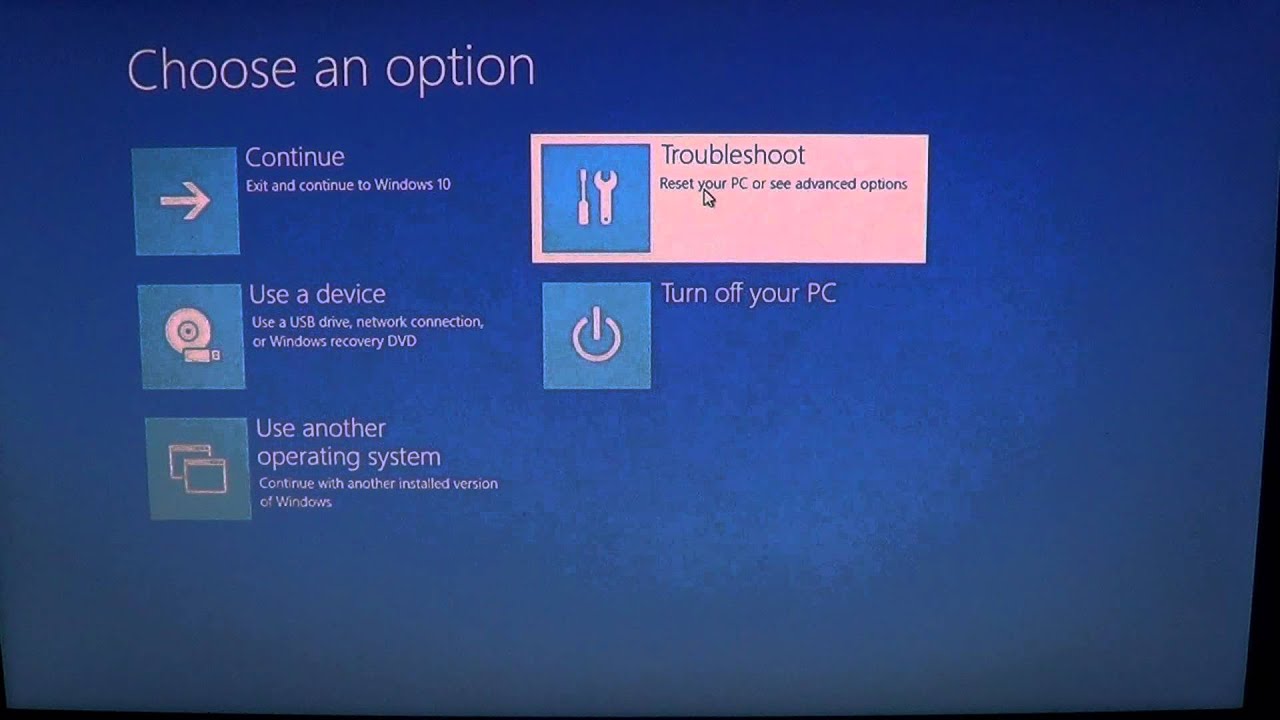
If something goes wrong together with your Windows 10 computer, thanks to a replacement app installation or a recent driver upgrade, simply trying to uninstall or roll back the driving force doesn’t always work. That’s where Windows 10 System Restore comes in, because it essentially allows you to jump back to a previous time, when Windows was working just fine.
But how does that employment , you ask? Well, it does that by creating “restore points” from time to time, generally once you install a replacement piece of software, or a Windows 10 update. Plus, it creates one hebdomadally anyway, and you’ll do so manually anytime.
Windows 10 restore points are effectively a picture of the important Windows stuff, your system files, registry settings, and hardware drivers themselves. It doesn’t take any of your personal documents into consideration, so this isn’t a backup by any means. counting on your system settings, alittle a part of your hard-drive is devoted to storing these restore points, which automatically clears out the old to form space for the new. You’ll still got to copy all of your personal data yourself, but Windows 10 restore points can help troubleshoot software issues on your Windows PC.
When you open System Restore, you’ll be presented with the available restore points, which can allow you to return to a selected time within the past. In short, Windows 10 System Restore allows you to revert to a state when your computer was working just fine.
Before you employ the feature, you ought to skills it impacts your computer. Since Windows 10 System Restore doesn’t make a backup of your personal documents, restoring your system won’t change any of them. Instead, it keeps a track of all the apps you had, so once you select some extent , any apps that were installed then are going to be gone, and therefore the uninstalled ones will come .
Once the method is completed , you’ll got to re-run the installers/ uninstallers to properly get obviate those you don’t want. Thankfully, Windows 10 does present you with an inventory of affected programs, making this process simpler.
How to found out System Restore on Windows 10
By default, the Windows 10 System Restore option is merely turned on for your primary drive, which contains all the required Windows files. If you’d wish to extend that coverage, follow these steps:
- Hit Start, and sort in “restore”.
- Choose Create a restore point.
- In the System Protection tab, under Protection Settings, you’ll see an inventory of obtainable drives on your computer, with an On or Off label next to them.
- Choose the acceptable drive, and click on Configure.
- Select activate system protection to enable System Restore. It should get on by default for C:.
- On an equivalent panel , adjust the Max Usage slider as you favor . The more room you create , the farther back you’ll prefer to go later.
How to create a restore point on Windows 10
In some cases, you would possibly want to make a restore point yourself, for instance , if you’re close to install an app or a replacement driver from an unconfirmed source. Here’s the way to set about that:
- Hit Start, and sort in “restore”.
- Choose Create a restore point.
- In the System Protection tab, under Protection Settings, click Create.
- Then, provides it a memorable name, and hit Create.
- After less a moment , you’ll be presented with a hit message. Click Close.
How to use System Restore on Windows 10
Hopefully, you’ll never even have to bother with this. But should that worrying day arrive, here’s how you’ll restore your system to an earlier point:
- Hit Start, and sort in “restore”.
- Choose Create a restore point.
- In the System Protection tab, under System Restore, click System Restore.
- A new panel will offer you a quick description of System Restore. Choose Next.
- On subsequent page, you’ll see the available restore points, with a date next to every of them. Select the specified one, and click on Scan for affected programs.
- In a new panel , you’ll have two different lists – the highest one shows programs which will be deleted, and therefore the bottom one shows programs which will be restored. Once you’ve noted the important ones, click Close.
- If you’re ready, choose the acceptable restore point, and click on Next.
- Windows 10 will ask you to verify . undergo the small print , then click Finish.
- In a final panel , System Restore will inform you that it “cannot be interrupted”. Click Yes to start .
The Windows 10 restore process will take over your computer, and finish in about quarter-hour , more counting on your CPU and hard-drive speed. Once it restarts, you’ll login to ascertain if everything is functioning fine. If it didn’t have the specified result, you’ll revert to your latest system settings instead, since System Restore always creates another restore point before starting itself.

Pokémon GO Hack Guide: How to Join Mega Mewtwo Y Raids Without Traveling

How to Change GPS Location on iPhone Without Jailbreak

MetaTrader 4 or 5: Which Trading Platform Is Right for You?

Why Modern Web Applications Are Moving Beyond Basic Dashboards
YouTube Offline: What Is It, and How to Save and Watch a Video Offline?

How to Download a Copy of Your Aadhaar Card

How to Book an Ola or Uber Using Google Maps

WhatsApp Web: Everything You Need to Know

The Surge of Mobile Betting Apps in India

In-depth Review of Parimatch: A Top Choice for Indian Punters
-
 Internet6 years ago
How to Download a Copy of Your Aadhaar Card
-
 Apps6 years ago
How to Book an Ola or Uber Using Google Maps
-
 How to6 years ago
WhatsApp Web: Everything You Need to Know
-
 Betting2 years ago
The Surge of Mobile Betting Apps in India
-
 Casino2 years ago
In-depth Review of Parimatch: A Top Choice for Indian Punters
-

 Apps6 years ago
How to Install WhatsApp Beta for Windows Mobile or Windows Phone
-
Sports4 years ago
10Cric India Bookmaker Review for Betting on Sports Online in 2022
-
Android Games6 years ago
LDPlayer vs Nox Player: Powerful Android Emulator for Gaming