
Key Highlights 📌
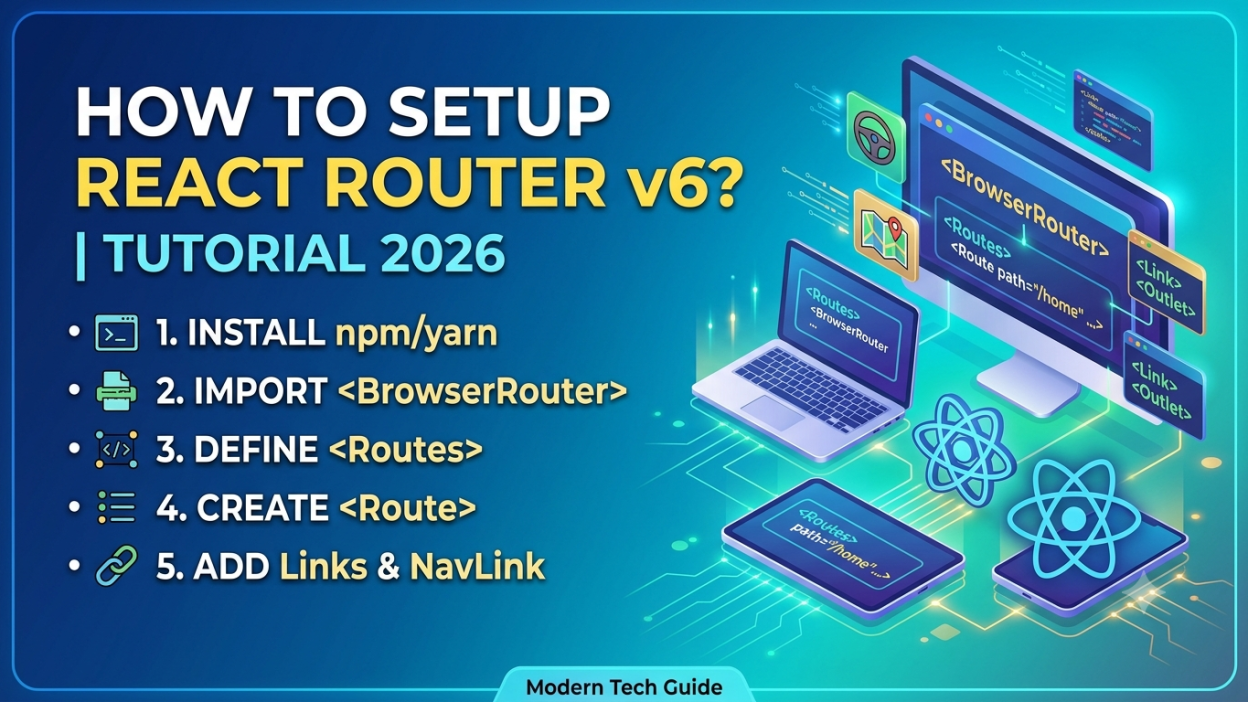
- ✅ Learn How to Setup React Router v6? | Tutorial 2026 from scratch.
- ✅ Install React Router DOM the right way.
- ✅ Understand BrowserRouter, Routes, and Route.
- ✅ Create multiple pages in React.
- ✅ Navigate using the Link component.
- ✅ Learn nested routes with simple examples.
- ✅ Avoid common beginner mistakes.
- ✅ Best practices for React Router in 2026.
How to Setup React Router v6? | Tutorial 2026
If you’ve been wondering How to Setup React Router v6? | Tutorial 2026, you’re in exactly the right place. 😊
When I first started learning React, one thing confused me more than components or hooks—it was routing. My React app worked perfectly, but every time I wanted another page like Home, About, or Contact, I had no idea how people switched between them without refreshing the browser.
That’s when I discovered React Router v6, and honestly, everything started making sense.
In this beginner-friendly guide, I’ll show you How to Setup React Router v6? | Tutorial 2026 step by step using simple language and practical examples. Even if you’ve never used routing before, you’ll finish this guide with a working multi-page React application.
Let’s get started! 🚀
What is React Router v6?
Before learning How to Setup React Router v6? | Tutorial 2026, let’s understand what React Router actually does.
Imagine you’re visiting an online shopping website.
When you click:
- 🏠 Home
- 👕 Products
- 📞 Contact
- 👤 Profile
Notice something?
The page changes almost instantly.
It doesn’t reload the entire website.
That’s exactly what React Router v6 helps us do.
It allows us to move between pages inside a React application while keeping everything smooth and fast.
Simply put,
Why Do We Need React Router? 🤔
Without routing, your React app would become one very long page.
Imagine building:
- An E-commerce website
- A Hospital Management System
- A Student Portal
- Netflix
Would you place everything inside one page?
Definitely not.
With React Router v6 Setup, you can organize your application into separate pages while keeping the user experience seamless.
Prerequisites Before React Router v6 Setup
Before starting How to Setup React Router v6? | Tutorial 2026, make sure you have:
- ✅ Node.js installed
- ✅ React project created
- ✅ VS Code
- ✅ Basic React knowledge
If you don’t have a React project yet, create one:
npx create-react-app my-appMove into the project:
cd my-appStart it:
npm startStep 1: Install React Router DOM
The first step in How to Setup React Router v6? | Tutorial 2026 is installing React Router.
Run:
npm install react-router-domThat’s it.
React Router DOM is now available in your project.
Step 2: Create Your Pages
Inside the src folder, create a folder called:
pagesNow create these files:
Home.js

About.js

Contact.js
Example:
Home.js
function Home() {
    return <h1>Home Page</h1>;
}

export default Home;
About.js
function About() {
    return <h1>About Page</h1>;
}

export default About;
Contact.js
function Contact() {
    return <h1>Contact Page</h1>;
}

export default Contact;
Simple, right? 😊
Step 3: Import React Router Components
Now comes the exciting part of React Router v6 Tutorial.
Open App.js
Import:
import {
BrowserRouter,
Routes,
Route
} from "react-router-dom";
These three components are the heart of React Router v6 Setup.
Step 4: Configure BrowserRouter
Wrap your application inside BrowserRouter.
<BrowserRouter>

</BrowserRouter>
Think of BrowserRouter as the manager that watches every URL change.
Whenever the URL changes, BrowserRouter decides which page should appear.
Step 5: Add Routes
Now define your routes.
<BrowserRouter>

<Routes>

<Route path="/" element={<Home />} />

<Route path="/about" element={<About />} />

<Route path="/contact" element={<Contact />} />

</Routes>

</BrowserRouter>
Now your React app knows:
- “/” → Home
- “/about” → About
- “/contact” → Contact
Congratulations! 🎉
You have completed the basic React Router v6 Setup.
Step 6: Add Navigation Links
Without links, users can’t move between pages.
Import:
import { Link } from "react-router-dom";Example:
<nav>

<Link to="/">Home</Link>

<Link to="/about">About</Link>

<Link to="/contact">Contact</Link>

</nav>
Now clicking each link changes the page instantly.
No refresh.
No loading screen.
Just smooth navigation.
That’s one of my favorite things about React.
Complete React Router Example
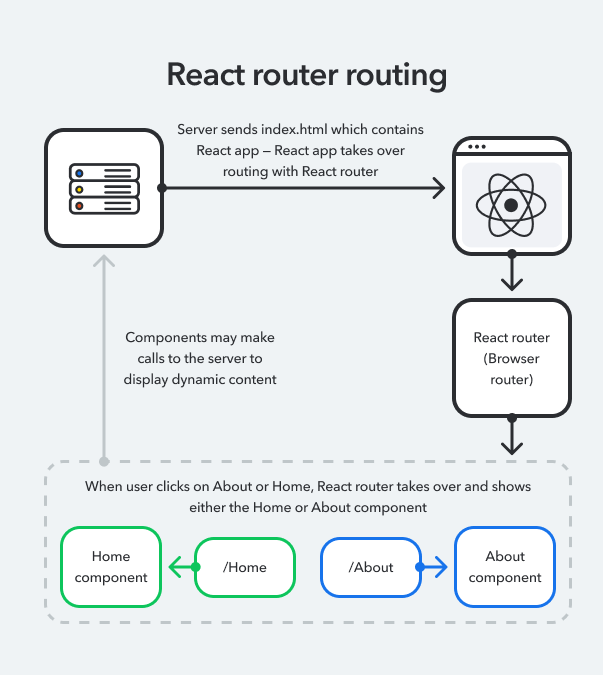
Here’s a complete example of How to Setup React Router v6? | Tutorial 2026.
import {
BrowserRouter,
Routes,
Route,
Link
} from "react-router-dom";

import Home from "./pages/Home";
import About from "./pages/About";
import Contact from "./pages/Contact";

function App() {

return (

<BrowserRouter>

<nav>

<Link to="/">Home</Link>

<Link to="/about">About</Link>

<Link to="/contact">Contact</Link>

</nav>

<Routes>

<Route path="/" element={<Home />} />

<Route path="/about" element={<About />} />

<Route path="/contact" element={<Contact />} />

</Routes>

</BrowserRouter>

);

}

export default App;
Understanding BrowserRouter, Routes, and Route
When I first learned React Router, I kept mixing these up. Here’s the easiest way I remember them:
| Component | Purpose |
|---|---|
| BrowserRouter | Watches the URL |
| Routes | Holds all routes |
| Route | Displays a component for a URL |
Think of it like this:
🏢 BrowserRouter = Building
🚪 Routes = Hallway
🚩 Route = Individual rooms
Simple visualization always helped me remember it.
Nested Routes in React Router v6
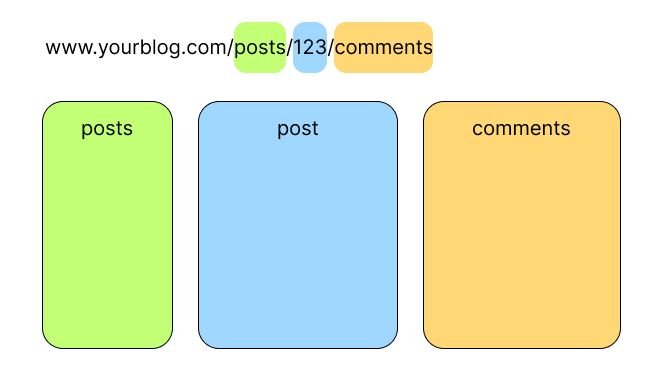
As your project grows, you’ll probably want pages inside other pages.
Example:
Dashboard

Dashboard/Profile

Dashboard/Settings
This is where nested routes become useful.
Example:
<Route path="/dashboard" element={<Dashboard />}>

<Route path="profile" element={<Profile />} />

<Route path="settings" element={<Settings />} />

</Route>
Nested routing keeps large applications clean and organized.
Common Mistakes Beginners Make ❌
I made almost every one of these mistakes when I started. If you avoid them, you’ll save yourself a lot of debugging time!
- ❌ Forgetting to install react-router-dom
- ❌ Using
componentinstead ofelement(React Router v6 useselement) - ❌ Forgetting to wrap the app with BrowserRouter
- ❌ Typing the wrong path
- ❌ Importing components from the wrong folder
- ❌ Using
<a>tags instead of<Link>for internal navigation
Best Practices for React Router v6 in 2026 🌟
As your React projects grow, these habits will make your code easier to manage:
- ✅ Keep all pages inside a
pagesfolder. - ✅ Use meaningful route names like
/productsor/profile. - ✅ Prefer
<Link>over regular HTML anchor tags for internal navigation. - ✅ Split large apps into reusable components.
- ✅ Plan your routes before building the application.
These simple practices have saved me a lot of time on larger projects.
Frequently Asked Questions (FAQs)
Is React Router v6 free?
Yes. React Router is completely free and open-source.
Can I use React Router without React?
No. React Router is specifically designed for React applications.
What is BrowserRouter?
BrowserRouter monitors the browser’s URL and renders the correct React component without refreshing the page.
Why do we use Link instead of <a>?
<Link> allows smooth client-side navigation without reloading the page, while an HTML <a> tag refreshes the browser.
Is React Router v6 beginner-friendly?
Absolutely! Once you understand BrowserRouter, Routes, and Route, creating multi-page React applications becomes much easier.
Final Thoughts 🎯
Learning How to Setup React Router v6? | Tutorial 2026 felt intimidating to me at first, but once I built my first multi-page app, everything clicked. If you’re just starting out, don’t worry if routing seems confusing initially. Practice by creating small projects with a few pages, experiment with different routes, and gradually explore advanced features like nested routes and route parameters.
The more you build, the more natural React Router will feel. Before long, you’ll be creating smooth, professional-looking React applications with confidence. Happy coding! 🚀
Want to learn more about React ?, Kaashiv Infotech Offers React course and more Visit Their website www.kaashivinfotech.com.

